Before: craft cabinet and grey shelf on one wall, and another grey shelf on the adjoining wall. Lots and lots of great storage, but not very attractive.

After! I should have checked my before pictures when I was taking new pictures so I could shoot from the same angle. This is the wall that used to house a craft cabinet and a grey shelf. We picked this piece up in an antique store in Paris, Tx for not much over $100. I sold the big grey shelves for a bit over $100 so the money was a wash, but not the storage space. DH still has some work to do on this cabinet, but it definitely looks more 'homey' than the grey shelves.
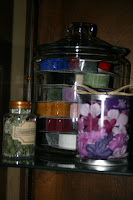
Close up of a new glass jar for ribbon. I do not intend to keep them in the jar that way, but I haven't had time to find ribbon cards to wind them on; the other is a small display in the glass cabinet of some things I've made that I switch out seasonally for display. In this case, it's for Valentines. ;)
more:
This is the other piece of new furniture. We bought this in a small downtown place for $60. It houses more crafty boxes. I also stole some ideas that I saw on other blogs and incorporated it such as the ribbon wrap in a shallow basket .

This is the view sweeping from the left of the room. I pulled my projects from the shelf in the wall and put my stamps back in there (it's odd but it was built for that). In the bay window is my tools table, and underneath it is my Iris cart - for lack of a better place to put it. I am on the hunt for a wooden table to buy and distress to replace the metal folding tables.
Next as I continue to sweep from the bay window to the right is where my tea cart now rests. I pulled my scraps and stickers from the plastic bins and put them in these picnic baskets I found. On top of the tea cart is my new basket from Target holding some idea books. Below : inside the picnic basket - the scraps separated by decofiles by CM.


I still have the craft cabinet and it now sits on the wall where one of the grey shelves used to sit. It was originally built for a small wall in the adjoining room. I have resituated some things on the cabinet, and I think the scale of this piece is wrong for the new glass cabinet, but it is what it is for now. :)

 Next to the craft cabinet is a hallway connecting the kitchen to this room. We block the hallway due to our labrador, so for now, my paper racks are in the hallway. On the bottom is my SU paper and my new Cropper Hoppers full of my 12 x 12 paper sits on top. This was one of my biggest areas of concern when I started the challenge: paper in five different places. I fused my 10 x 12 CM paper into the Cropper Hoppers too.
This is a stand I picked up at Ikea for $12. DH is going to add two mores shelves underneath so I can have a bit of a 'stamping zone' ala Penny! ;) I am also going to purchase a topper for this to add more stamp pads that are in the boxes in the glass case which is not very user friendly. I am going to distress this stand also.
I still have weeks to go back and address. I need to stamp off my stamp inventory, reconfigure my alterables, consolidate my ideas, and finish off ribbon. BUT, this post allowed me to see the changes I have made as I tend to get stuck on the ones still not completed. I also need to add some accents with window treatments and art work.
Thanks to Vicki for being here since the beginning and encouraging me. I have really enjoyed all of the encouragement and getting to know all the challenge folks : Penny, April, Maureen, Bree, Tracy, Kelly and everyone else and hope to see their rooms posted also!


4 comments:
I love how you've laid things out. Once you have all of the pieces distressed, it's going to be what you planned.
Jo-
This is looking great. Definitely a better view from the front room.
For tables, you might want to keep an eye out for antique library tables. Or a school teacher's desk for your tool table. I've seen good deals on them in antique stores because they are "authentically" distressed. :)
You sneaky girl!! This room looks great!! YOU HAVE COME A LONG WAY!!!
Love the new pieces!!
Hi there! Thanks so much for your comments on my scrap space- I'm so glad you liked it!
I made the ribbon cards myself- they are cut from chipboard from the backs of stacks and slabs that I took apart.
Post a Comment